Photobucket Photobucket Photobucket

Thursday, October 1, 2015

More Stamps Recreated


I came across these other stamp cards I made awhile back so I thought I would show these as well to add more images to yesterdays post.  It was hard and is still hard to cut up stamps. I felt the same way about cutting discarded books. The stamps I get are just stored in boxes and not in a nice fancy stamp book album. I am giving these old cancelled stamps a new life in some way. I still have plenty of untouched stamps that are preserved.

Tiny stamp houses


My "Stamp People". I made the guys pants out of a discarded atlas and his arms from old book pages.

This is a super easy birthday card. I used a Martha Stewart balloon punch
 and then drew the string on with a fine tip marker.

You should check out my friend Pamela's blog post from cappuccinoandartjournal.blogspot.com
on May 28th titled It's All about the Stamps!  Two of my cards are featured as well as a lot of other great images!

Wednesday, September 30, 2015

Stamps Recreated


Whenever I visit my parents in Chico, CA. I try to stop by The Penny Ranch. It is a shop filled with baseball cards, coins, comic books and a lot of collectibles. I go there for the postage stamps. The owner knows I don't want valuable stamps but just a lot of old cancelled stamps.  He brings out shoe boxes and old cigar boxes filled with them. I usually buy those boxes from him.  I like the cigar boxes as much as the stamps. He also sells me a lot of old letters and he knows I love airmail envelopes.  I will save most of those images  for another post. Here is a collection of some of my boxes that have come home with me for my art, collage, card making and my creative re-use workshops.


I started a "Stamp Cake" series using the cancelled postage stamps. They are so much fun to make and I am working on a series to reproduce. I cannot make them by hand fast enough to keep up with all the birthdays. The cake stand is made from discarded book pages, junk mail, and the insides of security envelopes. I cut the candles out from the sides of vintage airmail envelopes and the flames from are made from scrap paper. 


I could not resist putting in one image of some of the old letters I have bought
from The Penny Ranch. I am working on some collage pieces with these envelopes and stamps.


Thursday, June 11, 2015

Card and wallet holder tutorial


I have been making these card holders for years. I saw this fold on a youtube video some years ago as as photo holder. I am sorry I do not remember who posted it.  I adapted it to make it the size and made some adjustments for holding business cards, gift cards or to use it as a small wallet when you don't want to carry you larger one. I have used a variety of paper including maps, posters, ledger
paper and tyvek envelopes (from old USPS or FedEx envelopes) that are tear proof and water
proof. You can even print on the tyvek but be careful as all printers will not take the material. 


Start with a piece of paper that is 8.5 inches wide by 9.5 inches tall. Put the side of the paper
you would like to be on the outside of the wallet face down on the table. Place the paper in a vertical position with the 8.5  horizontally in front of you.


Fold the paper in half vertically and crease the fold crisply. You can use a bone folder or a
credit card to make a clean fold.


Open the paper and take each side and fold just shy of the center. Leave a gap. About 1/8 of an inch.
I don't measure but just do not fold to the center or past the center of the paper.

Open the paper and fold in all four corners to the fold line. Crease the paper.

Keeping the corner triangles folded in now bring in the sides of the paper on the fold.
Do this on both sides of the paper.


Your paper should look like this and you will be ready to make the final folds!
Flip the paper over.


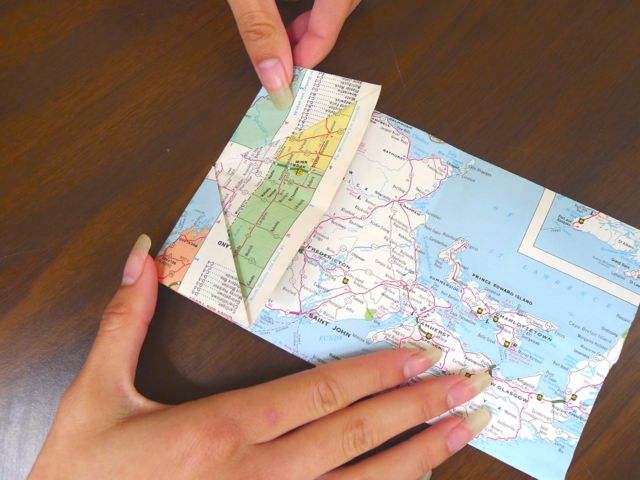
You will now fold the bottom of the paper up by following where the angled paper meets. (this
is difficult to explain but hopefully the close up picture shows you what I mean. No measuring is
needed. Just use the folds to guide you.

Here is another photo to show this fold.

Now for the final fold you take the top and fold it under the bottom triangles. You can test the 
distance of how much to fold in by using a credit card as a guide.

Tuck in the folds and crease the paper for your completed card holder!


You have six pockets to put items in. The two sides with the triangle folds.

You can also tuck cards into the side too and the back side as well. (not pictured)

I will try to post later some other versions of this wallet/card holder soon. School just ended for my
son today so I finally got to sneak this post in-- as summer officially started today!  And that I hope
means more time to re-create and less driving!

These little holders are great for putting gift cards in for presents. In fact this map one would
be great to put in a gas card in for a gift or tuck in money for a trip. 

(Thank you to my daughter for being my hand model and once again to friend Pamela at cappuccinoandartjournal.blogspot.com for her blog help)

Friday, May 22, 2015

Altered Book Day


I took a trip to Marin County yesterday with friends Margie, Pamela www.cappuccinoandartjournal.blogspot.com and Dorothywww.dotsrainbow.com
to see the Marin Museum of Contemporary Art Altered Book and Book Arts annual
show. It also had a San Quentin Prison Arts Project show as well.

This is Dorothy Yuki's piece that received Honorable Mention. Last year Dorothy also received an
Honorable Mention on her altered book in this annual show. Congratulations again!


This is my untitled piece that I entered in the show. It is made entirely of discarded library books. It
is my second collage piece using books that I have rescued from the landfill.

This piece is made by our friend Punky from our SF Correspondence Group in San Francisco.


Hedi Kyles book. A collaborative piece with her graduate students using stencils.


These two pieces are from the San Quentin Prison Art Project that was on display. 


After seeing the show in Novato we headed to Mill Valley for another book 
show at Seager/Gray Gallery. Here a few pieces from that great show.


We ended the fun afternoon by stopping at Sol Food to pick up some Puerto Rican food. Loved those
garlic plantains. We headed back into the city avoiding the traffic.. Tonight is the closing and live auction at the MOCA. Sadly I will miss it but it should be a fun time. I was inspired by all that afternoon of altered books!