


 |
| Here is a booklet tutorial that I showed Pamela from Cappuccino and art Journal and the other friends who gathered at my studio a few weeks ago. I used a page from an old atlas from the the library book sale that I went to with Pamela and Leslie. |
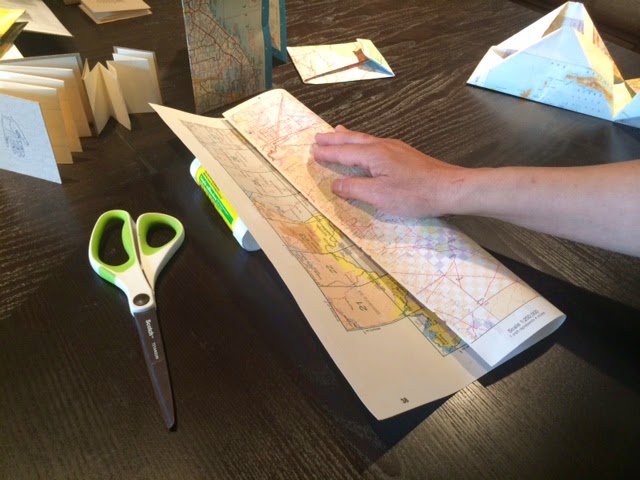 |
| Put the image that you want on the outside of the booklet face down on the table. Next fold the paper into thirds. You can measure if you like or eyeball it like I do. |
 |
| Make a nice crisp fold using a bone folder. If you don't have a bone folder use a credit card to help crease crisp. |
 |
| Open the paper and fold in half and crease your fold. |
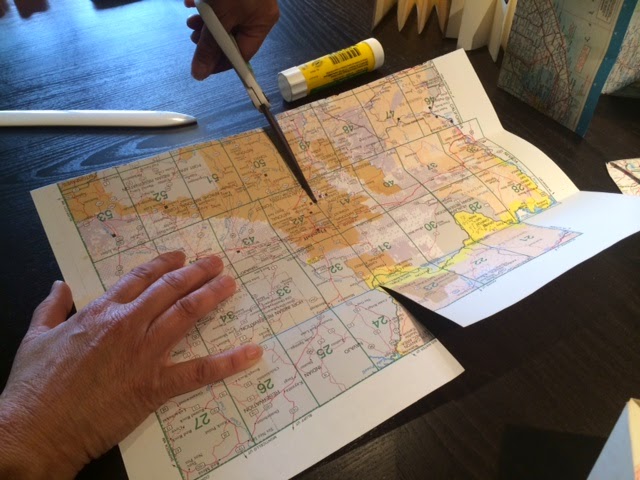 |
| Take your pair of scissors and and cut from each side of the paper to the first fold. |
 |
| You will now fold the corners in to the first fold making a triangle. |
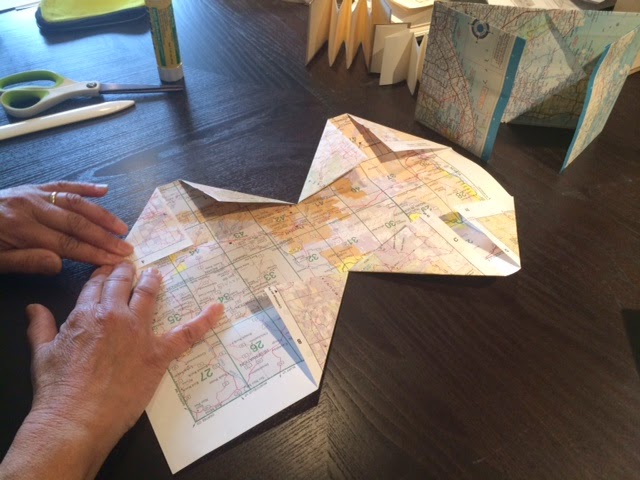 |
| Repeat the folds to all corners of the paper. |
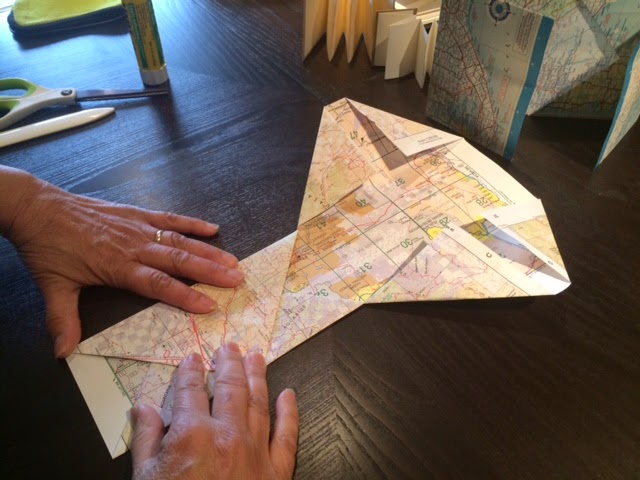 |
| Fold in the sides of the paper on the fold line. |
 |
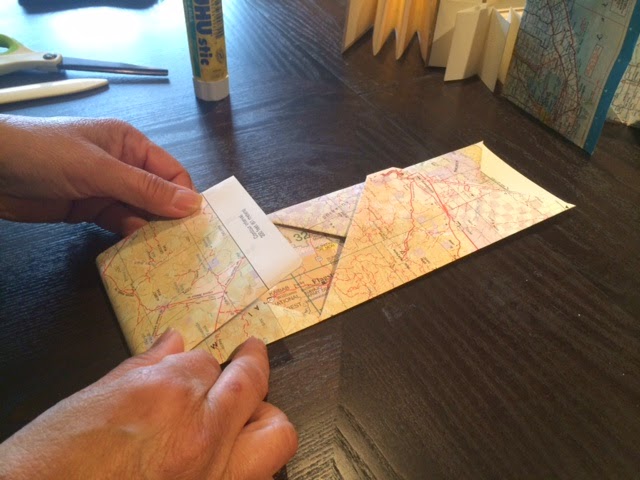 |
| Fold each end to the center fold. |

 |
| Here is your finished envelope booklet! |
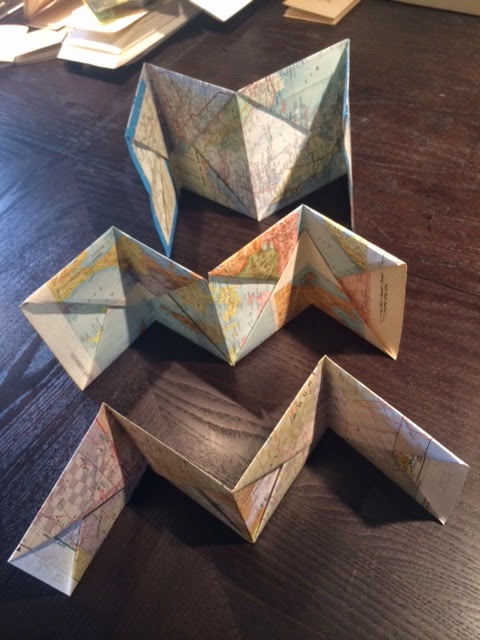 |
| Here are three more envelope booklets made from different atlases We made these at the party I hosted in my newly cleaned studio. I hope to add some more envelope tutorials soon. I have a lot I want to share using repurposed materials of course! |
photographs for this tutorial and for all her technical help as well. Her help
and encouragement will get me posting on a more regular basis!
Great tutorial (if I do say so myself!). I am so happy you showed me how to make those cool booklets and now everyone can do it! i google+--ed it too so maybe some new folks will see this post.
ReplyDeleteMany thanks to you Pamela for your help, photography and generosity in spreading the word about this tutorial. I really appreciate it so much!
DeleteYou are very welcome, Monica! You are very talented and I look forward to seeing more posts and tutorials from you.
DeleteVery cool, thanks a lot! I love all sorts of books and booklets, and when Pamela first posted this, I asked if you'd share the instructions, and here they are. Just made one but my paper's too thick, so will do a few more with thinner papers. Thanks!
ReplyDeleteDear Leslie,
DeleteI am happy you liked the post. I love all sorts of books, envelopes, vintage papers and more. As you can see from my studio I have quite a collection. It was fun to share and make things together!
Already made on! Thank you, they are lots of fun. :-)
ReplyDeleteDear Nina, Thanks for looking at the post. I hope to share some other versions of this envelope and other tutorials in the future.
DeleteThank you! I always love making new envelopes! Got the invite from Pamela....
ReplyDeleteThanks for looking at the blog. Pamela was so great in helping me get over some technical glitches and encouraged me to start posting again! I love envelopes too especially made with repurposed materials.
DeleteI, too, have found you via Pamela. Thank you for this great tutorial. I'm going to make one tonight!
ReplyDeleteThanks for looking. Pamela has sent many people my way. We had a lot of fun doing some mail art, book making and more.
DeleteThanks for this! I have pinned it and will be making one soon!
ReplyDeleteDear Susan, Thank you for looking at the blog. Hope you have fun making a lot of envelopes. There are several versions of this envelope I will try to post soon.
DeleteGreat tutorial. Good job Monica!
ReplyDeleteThanks Dorothy! I finally got the tutorial posted for the envelope and hope to do more soon.
DeletePamela is showing people the way to this post, it seems! Great tutorial, I need to bookmark this one.
ReplyDeleteYes, Pamela was kind enough to help me out with my blog! I hope to be posting more often now that she helped me. She is a great inspiration isn't she?
DeleteSo excited to make this, thanks for the how-to!!
ReplyDeleteThanks for looking at the blog. I am trying to get the next how-to going shortly on a favorite paper wallet.
DeleteThanks so much again! I finally blogged about the projects I've been making & I see many more of these in my future. (http://tamdoll.com/papercraft-folded-booklets/)
DeleteThey looked great and thanks for the shout out of my blog and Pamela's. I really appreciate it. I hope you like the next tutorial coming up. I will follow your blog now.
DeleteHi Monica, I just used your great tutorial - thank you so much!!! Ali
ReplyDeletehttps://vintagepagedesigns.com/envelope-book/
Very rapidly this website will be famous amid all blogging and site-building users, due to it's good articles or reviews msn hotmail sign in
ReplyDeleteI truly value this superb post that you have accommodated us. I guarantee this would be helpful for a large portion of the general population. 55printing.com
ReplyDeleteIf you'd like to decrease your mortgage payment further, compare National Bank's increasing against mortgage brokers and other lenders to discover the lowest type of loan. canada mortgage calculator How much it is possible to afford to spend on a home in Canada is most determined by simply how much you can borrow from a home loan provider. canada mortgage calculator
ReplyDeleteThanks so much for publishing this! Your instructions are so clear, and your post is inspiring.
ReplyDeletehttps://bayanlarsitesi.com/
ReplyDeleteYenibosna
Anadolu Kavağı
İçerenköy
Yeşilköy
Q80J37
Denizli
ReplyDeleteErzurum
Samsun
Malatya
Niğde
1BQ
bitlis
ReplyDeleteurfa
mardin
tokat
çorum
RWN04U
7DD2B
ReplyDeleteÇerkezköy Mutfak Dolabı
Antep Evden Eve Nakliyat
Bartın Şehirler Arası Nakliyat
Hakkari Evden Eve Nakliyat
Rize Parça Eşya Taşıma
Kocaeli Evden Eve Nakliyat
Niğde Lojistik
Çankırı Parça Eşya Taşıma
Ünye Halı Yıkama
59DCE
ReplyDeletesohbet sitesi
kızlarla rastgele sohbet
yalova canlı görüntülü sohbet
canlı görüntülü sohbet uygulamaları
bayburt parasız sohbet siteleri
kastamonu sesli sohbet siteler
hakkari kadınlarla görüntülü sohbet
van ucretsiz sohbet
burdur canlı sohbet
100FE
ReplyDeleteTelegram Abone Satın Al
Bitcoin Kazanma
Coin Oynama
Bitcoin Nasıl Alınır
Instagram Takipçi Hilesi
Tiktok Beğeni Satın Al
Tiktok İzlenme Satın Al
Bitranium Coin Hangi Borsada
Ön Satış Coin Nasıl Alınır
0B24F
ReplyDeletemercatox
bybit
bitcoin seans saatleri
binance
kripto para kanalları telegram
canlı sohbet
en eski kripto borsası
filtre kağıdı
4g proxy
ECCA6
ReplyDeletecanlı ücretli şov
9348E
ReplyDeletesanal ücretli show
93B4D
ReplyDeletewhatsapp görüntülü show güvenilir
Thank you so much for sharing this tutorial Very appreciated. boston iron works
ReplyDeleteDEB10FFB67
ReplyDeletenovagra
kaldırıcı
kamagra
yapay kızlık zarı
viga
geciktirici
sinegra
sertleştirici
themra macun
FC9E086809
ReplyDeletetwitter ucuz beğeni satın al
A37A27A43B
ReplyDeletegörüntülü show
novagra hap
viga
görüntülü şov whatsapp numarası
vega
sildegra
telegram show
cobra vega
stag
0337163CCD
ReplyDeletetakipçi
D29C4C3992
ReplyDeletemmorpg oyunlar
sms onay
mobil ödeme bozdurma
takipçi satın alma
-
76B260D26B
ReplyDeleteonline mmorpg oyunlar
sms onay go
güvenilir mobil bozum
en iyi takipci satin alma sitesi
-
A2ED9F5F90
ReplyDeletekiralık hacker
kiralık hacker arıyorum
kiralık hacker
hacker arıyorum
kiralık hacker
36FC25E448
ReplyDeletekiralık hacker
kiralık hacker arıyorum
kiralık hacker
hacker arıyorum
kiralık hacker
E2A50EEDE9
ReplyDeleteucuz takipçi satın al
bradney swivel accent chair
BD6409DC7F
ReplyDeletex takipçi satın al
swivel accent chair set of 2
AF8EC806E2
ReplyDeleteİnternet üzerinde içerik üretmek isteyen birçok kişi, izlenme sayılarını artırmak için çeşitli yöntemlere başvuruyor. Özellikle YouTube'da başarılı olmak için 4000 saat izlenme şartını yerine getirmek büyük önem taşıyor. Bu noktada, youtube 4000 saat izlenme satın al seçeneği, birçok içerik üreticisinin ilgisini çekiyor ve süreçleri hızlandırabiliyor. Ancak, bu adımı atmadan önce dikkatli olmak ve güvenilir kaynakları tercih etmek gerekiyor. Sonuç olarak, doğru stratejilerle ilerlemek, başarıyı beraberinde getirir.
Sosyal medya etkileşimlerini artırmak isteyenler için çeşitli yöntemler bulunmaktadır. Örneğin, kwai beğeni satın alarak içeriklerinin daha fazla kişiye ulaşmasını sağlayabilirler. Bu sayede profilin görünürlüğü artar ve takipçi sayısı hızla çoğalır. Ancak, doğru ve güvenilir kaynaklardan alışveriş yapmak önemlidir. Böylece, organik büyüme sağlamak mümkün olur.
Sosyal medya hesaplarınızı daha fazla kişiye ulaştırmak istiyorsanız, çeşitli yöntemler deneyebilirsiniz. Örneğin, bazı kullanıcılar facebook beğeni hilesi gibi araçlar kullanarak beğeni sayılarını artırmayı tercih edebiliyor. Ancak, bu tür yöntemlerin hesabınıza zarar verebileceğini ve platform kurallarına aykırı olabileceğini unutmamak önemlidir. Organik ve sürdürülebilir büyüme sağlamak için kaliteli içerik üretmeye odaklanmanız daha doğru olacaktır.
Sosyal medya hesaplarınızı daha fazla kişiye ulaştırmak için çeşitli yöntemler deniyorsanız, dikkatli olmanızda fayda var. Özellikle instagram beğeni hilesi gibi yöntemlerin güvenilirliği konusunda şüpheleriniz olabilir. Bu tür araçlar kısa vadede popülerliğinizi artırabilir gibi görünse de, hesabınızın güvenliği açısından risk taşıyabilir. Doğru ve organik büyüme yollarını tercih etmek, uzun vadeli başarı için en sağlıklısıdır.
67A83935
ReplyDeleteNáhodný chat
Rastgele Sohbet
Случайный чат
Chat aleatorio
Véletlenszerű csevegés
Náhodný chat
Chat aleatoriu
Satunnainen keskustelu
Losowy czat